Automating deployments for Azure Data Factory (ADF) can help streamline updates, reduce manual errors, and ensure consistency across environments. A well-configured CI/CD pipeline allows you to automatically validate, test, and deploy ADF changes with minimal effort.
GitHub Actions provides a straightforward way to implement CI/CD for Azure Data Factory, enabling automated integration and deployment directly from your GitHub repository. In this guide, we’ll walk through setting up a CI/CD pipeline using GitHub Actions, covering key steps such as exporting ADF resources, managing configurations, and deploying changes to different environments.
By the end of this tutorial, you’ll have a functional pipeline that automates your ADF deployment process, improving efficiency and reliability. Let’s get started!
Prerequisites
There are some prerequisites that need to be fulfilled for our approach to work:
- Azure Subscription
- Azure Resource Groups for DEV and PROD environments
- Azure Data Factory instances for DEV and PROD
- GitHub repository
Setup
The setup for this demo looks like this:
We have one Azure Subscription containing two resource groups. One resource group covers the DEV environment (rg-demo-adf-github-dev) and the other resource group covers the PROD environment (rg-demo-adf-github-prod). Each resource group contains an Azure Data Factory.
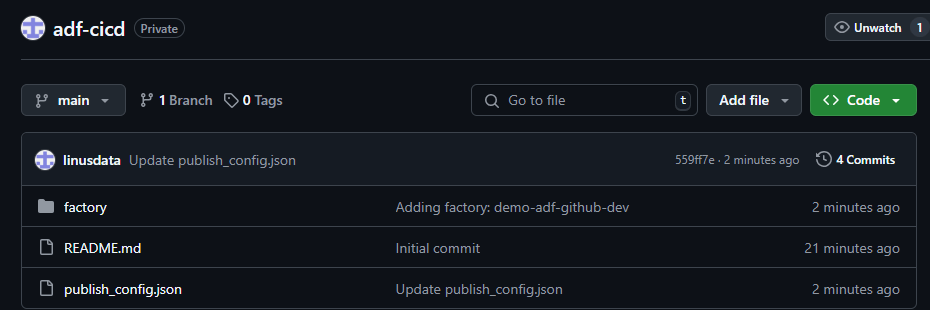
Additionally we have setup a GitHub repository called “adf-cicd”.
The goal is to create a CI/CD pipeline that automatically deploys the Azure Data Factory from the DEV to the PROD environment.
Step 1: Connecting our DEV Azure Data Factory to our GitHub repository
To connect our DEV Azure Data Factory to our GitHub repository we need to open the ADF. We then navigate to the “Manage” section and click on “Git configuration”.

Once we click on “Configure” a side menu will open. We select GitHub as Repository type and type in the GitHub repository owner. In this case it is “linusdata”. If the GitHub repository was created in an organisation type in the name of the organisation. We can then select an existing repository under “Repository name”. In our case the repository name is “adf-cicd”. We can then choose a collaboration branch, a publish branch and a root folder. The Azure Data Factory will make suggestions for these values. In our demo we are sticking to these suggestions. We finish the Git configuration by clicking on “apply”.

If the configuration was successful we will now see a summary of the configuration.

Additionally you will now see that the main branch of your repository contains at least a folder “factory” and a “publish_config.json” file.
Step 2: Create a user-assigned managed identity
In order for GitHub to be able to access Azure and deploy our ADF we need to setup a user-assigned managed identity and federated credentials within the target (PROD) resource group.
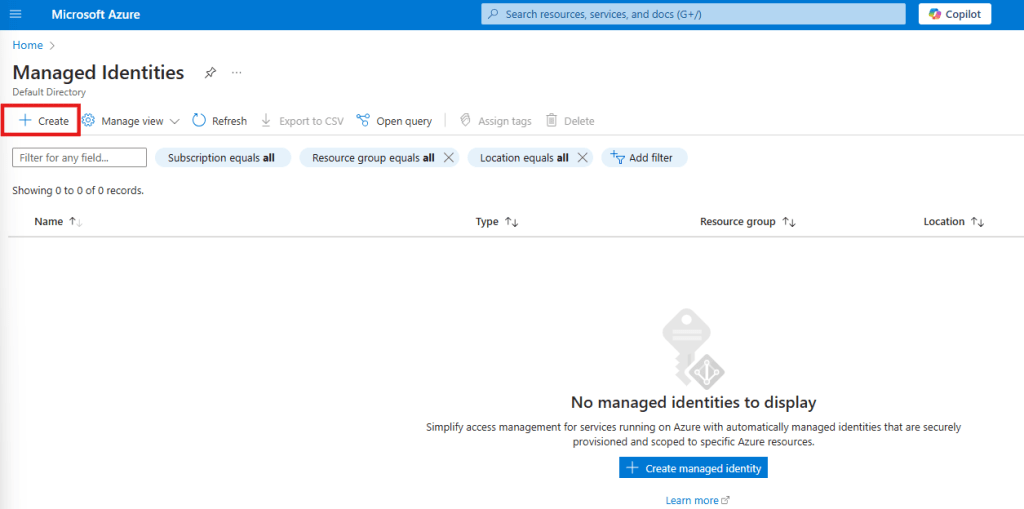
To do so we simply search for “Managed Identities” in the Azure Portal and click on the Service. By clicking on “Create” we can setup a new managed identity
This will open the configuration menu. Select the Subscription and Resource group where your PROD ADF is located, select a Region and give your new User Assigned Managed Identity a name.

Then click on “Create” to deploy you new managed identity. Once the new resource has been deployed we can open it. To add the federated credentials we need to navigate to “Settings” and then “Federated credentials”.
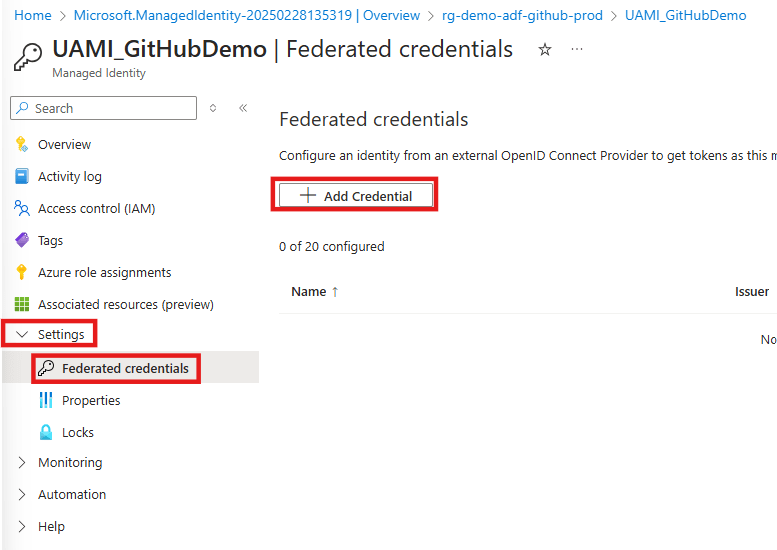
As the scenario we select “Github Actions deploying Azure resources”. We then enter the Organization and Repository name. Under “Entity” we select “Branch” and set the “main” branch. Finally we need to give a name to the new federated credentials. We confirm by clicking on “Add”.

We have now enabled GitHub to access Azure. There is only one thing left to do and that is to assign the “Data Factory Contributor” role within the target (PROD) resource group to the newly created managed identity. We can do so by navigating to the target resource group. Once there we click on “Access control (IAM)” then on “Add” and finally on “Add role assignment”.

We then search for “Data Factory Contributor”, select the Role and click on “Next”.

We then select “Managed identity and click on “select members”. Under “Managed identity” we select “User-assigned managed identity” and click on the newly created managed identity.

We confirm the role assignment by clicking on “review and assign”.
Step 3: Configure the GitHub secrets
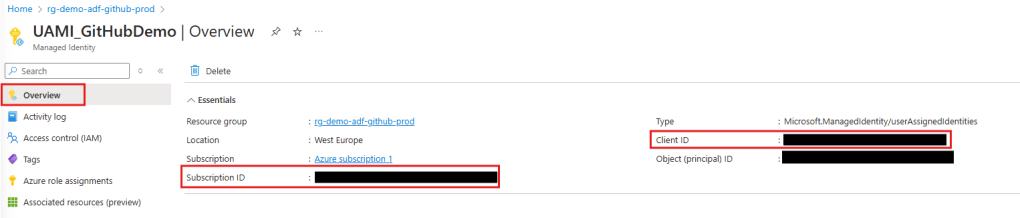
To enable GitHub to deploy our ADF from DEV to PROD we need to store some Azure Credentials as secrets in our GitHub repository. These Credentials are the Subscription ID and the Client ID of our Managed Identity and the Tenant ID of our subscription.
To retrieve the subscription and client id we open the managed identity. In the Overview we will find the needed id’s and can copy them to a notepad.
To retrieve the tenant ID we search for “Microsoft Entra ID” within Azure and open the Service.

Now that we have stored the three needed ID’s in a notepad we can switch over to GitHub where we will create the secrets. To do so we go into the settings. Under “Security” we select “Secrets and variables” and click on “Actions”. There we will create our new repository secrets.
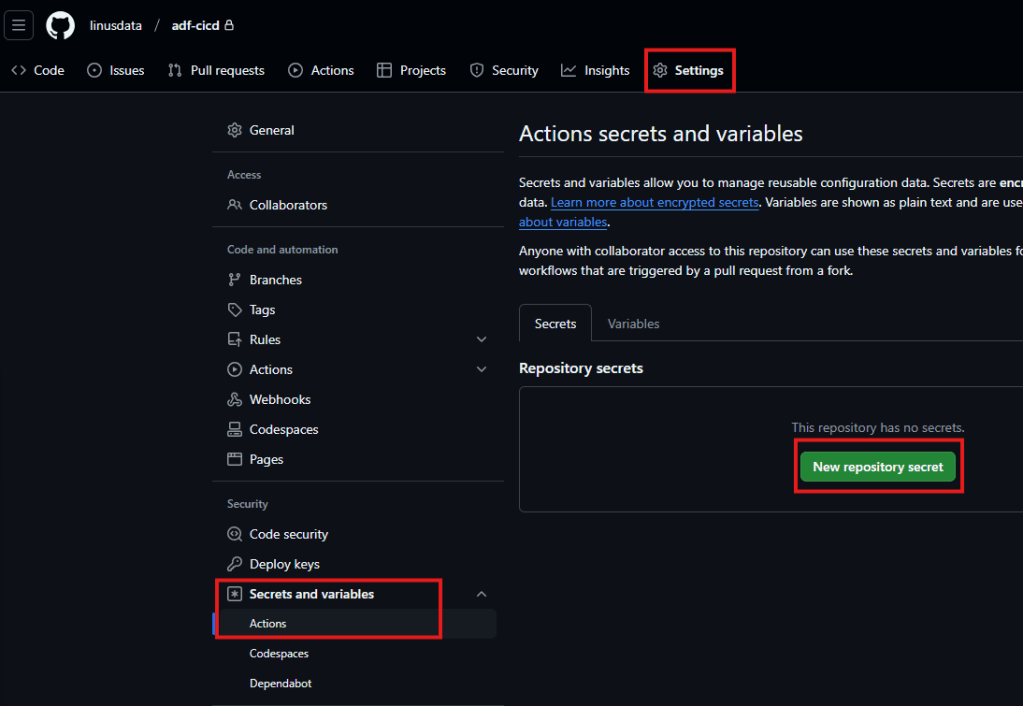
We will create three secrets called “AZURE_TENANT_ID”, “AZURE_SUBSCRIPTION_ID” and “AZURE_CLIENT_ID”. Once you are done your GitHub should look like this:

Step 4: Setup the CI/CD pipeline in GitHub
Before we can setup our actual CI/CD pipeline we need to add one file to our repository. The file is called “package.json” and I have put it into a folder called “build”. This file simply contains the package name needed for our CI/CD pipeline to work. Its full content is the following:
{
    "scripts":{
        "build":"node node_modules/@microsoft/azure-data-factory-utilities/lib/index"
    },
    "dependencies":{
        "@microsoft/azure-data-factory-utilities":"^1.0.0"
    }
}
Here is what it should look like in your GitHub repository:

We are now ready to create our CI/CD pipeline. To do so we navigate to “Actions” and click on “set up a workflow yourself”.

This will open a .yml file with the name “main.yml”. In there you can paste the following code:
on:
  push:
    branches:
    - main

permissions:
      id-token: write
      contents: read

jobs:
  build:
    runs-on: ubuntu-latest
    steps:

    - uses: actions/checkout@v3
# Installs Node and the npm packages saved in your package.json file in the build
    - name: Setup Node.js environment
      uses: actions/setup-node@v3.4.1
      with:
        node-version: 18.x

    - name: install ADF Utilities package
      run: npm install
      working-directory: ${{github.workspace}}/build  # (1) provide the folder location of the package.json file

# Validates all of the Data Factory resources in the repository. You'll get the same validation errors as when "Validate All" is selected.
    - name: Validate
      run: npm run build validate ${{github.workspace}}/ /subscriptions/<yourSubscriptionID>/resourceGroups/<yourDevResourceGroupName>/providers/Microsoft.DataFactory/factories/<DevdataFactoryName> # (2) The validate command needs the root folder location of your repository where all the objects are stored. And the 2nd parameter is the resourceID of the ADF instance
      working-directory: ${{github.workspace}}/build


    - name: Validate and Generate ARM template
      run: npm run build export ${{github.workspace}}/ /subscriptions/<yourSubscriptionID>/resourceGroups/<yourDevResourceGroupName>/providers/Microsoft.DataFactory/factories/<DevdataFactoryName> "ExportedArmTemplate"  # (3) The build command, as validate, needs the root folder location of your repository where all the objects are stored. And the 2nd parameter is the resourceID of the ADF instance. The 3rd parameter is the exported ARM template artifact name
      working-directory: ${{github.workspace}}/build

# In order to leverage the artifact in another job, we need to upload it with the upload action
    - name: upload artifact
      uses: actions/upload-artifact@v4
      with:
        name: ExportedArmTemplate # (4) use the same artifact name you used in the previous export step
        path: ${{github.workspace}}/build/ExportedArmTemplate

  release:
    needs: build
    runs-on: ubuntu-latest
    steps:

 # we 1st download the previously uploaded artifact so we can leverage it later in the release job
      - name: Download a Build Artifact
        uses: actions/download-artifact@v4
        with:
          name: ExportedArmTemplate # (5) Artifact name


      - name: Login via Az module
        uses: azure/login@v1
        with:
          client-id: ${{ secrets.AZURE_CLIENT_ID }}
          tenant-id: ${{ secrets.AZURE_TENANT_ID }}
          subscription-id: ${{ secrets.AZURE_SUBSCRIPTION_ID }}
          enable-AzPSSession: true

      - name: data-factory-deploy
        uses: Azure/data-factory-deploy-action@v1.2.0
        with:
          resourceGroupName: <ProdResourceGroup>
          dataFactoryName: <ProdDataFactoryName>
          armTemplateFile: ARMTemplateForFactory.json
          armTemplateParametersFile: ARMTemplateParametersForFactory.json
          #additionalParameters: # (10) Parameters which will be replaced in the ARM template. Expected format 'key1=value key2=value keyN=value'. At the minimum here you should provide the target ADF name parameter. Check the ARMTemplateParametersForFactory.json file for all the parameters that are expected in your scenario

          # skipAzModuleInstallation:  # Parameters which skip the Az module installation. Optional, default is false.
I know the code looks bad here, but don’t worry. Once you copy it into your GitHub it will look much better. Make sure you replace all the placeholders indicated by “<…>”. There are five three placeholders that you need to replace in line 28 (Subscription ID, Name of DEV Resource group and Name of DEV ADF). The same placeholders also must be replaced in line 33. Finally you need to add the Name of your target (PROD) resource group in line 66 and the Name of your target (PROD) ADF in line 67. Once you have made the replacements you can click on “commit”. The file is then added to your repository. In the first 4 lines of the file we define that the workflow should be started everytime you commit to the “main” branch. This means that the workflow will immediately be triggered. Most likely it will fail the first time as there is no ARM Template to retrieve yet.
By clicking on “Actions” again you can see the workflow. You can then click on the workflow and will see that our CI/CD pipeline consists of two steps (build and release).
We can now test our CI/CD pipeline.
Step 5: Test your CI/CD pipeline
To test our CI/CD pipeline we open the DEV ADF and create a simple pipeline that only consists of a “Wait” activity.
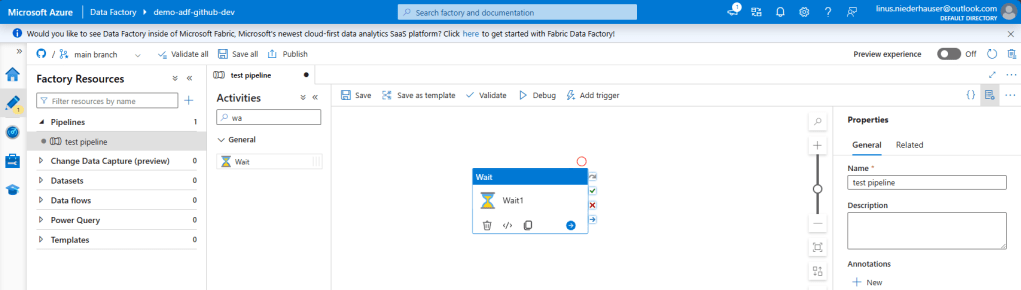
Once the test pipeline is created we simply click on “Save all”. This will save the Pipeline to our GitHub repository. Make sure you click “Publish” as well. This will automatically create the “adf_publish” branch which is necessary for our CI/CD pipeline to work. The “adf_publish” branch will hold the ARM templates that are extracted, validated and released within our CI/CD pipeline.
We can now open the GitHub workflow again by clicking on “Actions” and selecting the newly created workflow. As we created our ADF “test_pipeline” in the main branch directly the workflow was automatically triggered as soon as we clicked on “Save all” in the ADF. If you have setup everything correctly the workflow will look like this:

As you can see the CI/CD pipeline was successful. We can also check this by opening our PROD ADF. The newly created “test_pipeline” should now also be visible in our production environment.

And tadaaa the pipeline “magically” appears in our PROD environment.